 Technical Support
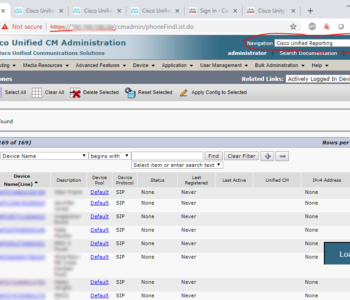
Cisco Unified Reporting (Phone Call Report)
Login to https://192.168.100.10
Navigation -> Cisco Unified Reporting
System Reports

 Technical Support
Login to https://192.168.100.10
Navigation -> Cisco Unified Reporting
System Reports
 Technical Support
The tape backup procedure is conducted on Monday or Tuesday mornings. Weekly tape backups are picked up and stored offsite on Wednesday mornings, usually between 10AM and noon.
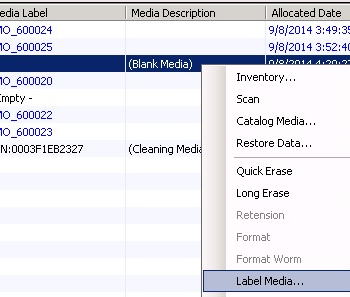
Identifying which tape will be replaced.


Slots 1-7 contain backup tapes. Tapes that have yet to be used (blank) will have purple text. Slot 8 will always have black text. The tape(s) that contain(s) backed up data and needs exchanging with a blank tape will be found in slots 1-7 and will have black writing. It will also usually have the lowest label number as indicated by the last two digits of the label in the media label column.
After you have identified which tape to replace, make a note of which slot the tape is located in. You will now physically replace the tape.
Physically replace the tape.
Physically replacing the tape has been completed. Return to your PC to complete the remaining steps.


On Wednesday morning, our offsite storage solution company will stop by to collect the weekly backup tape box. They will drop off a new metal box that contains a backup tape that has been stored offsite for 3 months. They will also provide two receipts, one to sign for them and our copy. Place our copy in the back of the backup log book. Remove the old tape from the metal box and place in the storage bin on the floor right next to the backup log book.
 Technical Support
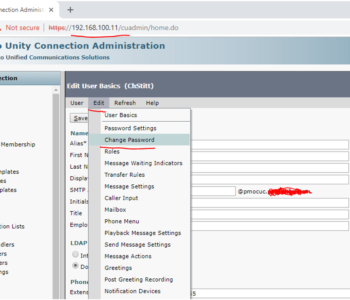
Login to Cisco Unity Connection (Voicemail Server)
https://192.168.100.11
Click Users -> Select User -> Edit -> Change Password
Enter new PIN (cannot be 12345)

 Technical Support
Change TWL Output file name from DAT to TXT
Open TLW (TrustedLink for Windows)
Click Administration

Click Trading Partners

Select the Trading Partner
Select the Transaction Type (803, 862)
Click ST Details

Put in the Target Filename

Click Okay
 Technical Support
This guide is to create a report on the anti-virus server for JSOX/Internal.
Use your AD login accounts on PMBU1/Anti-virus database.
Step 1: Log into BackupExec Server.

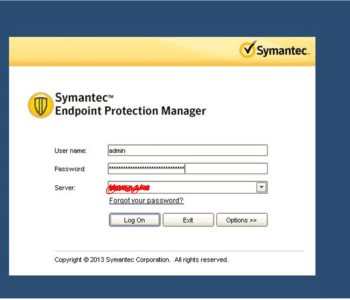
Step 2: Open up SEPM (Symantec Endpoint Protection Manager)

Step 3: Log into SEPM with the “admin” username and the really long password associated with it.

Step 4: Click on the “reports” tab.

Step 5: This is where you’d choose your type of report. Last, you would just click create report after customizing the type of report.

 Technical Support
TRUSTEDLINK FOR WINDOWS (TLW) DATABASE MAINTENANCE
At Meta Tech we recommend TLW Desktop Users perform the following functions on a monthly basis. This will fix slow TrustedLink (slow TLW).
How to reduce the size of the database.
** Backup TLW\Work, Document, Table, Maps, Mapdata and Scripts. Users should maintain a good backup of your TLW computer.
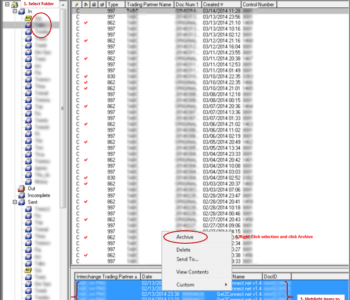
How to archive TLW Documents?

Note: Do not archive at the document level, rather than at the interchange level- if the archive is done by document, the interchange information linking the document to a trading partner will be lost.
How to delete Text Documents?
1. Open TLW Operations
2. Go to TEXT Documents
3. Click Edit, Select All
4. Return to highlighted documents (blue), right click then Delete
How to delete or clear Events?
1. Open TLW Operations
2. Click View -> Select Events
3. Click File, Clear All Events
4. Close the Window
How to delete Log Files?
1. Open TLW Operations
2. View -> Select Log Files
3. Select “Operations” and/or “Command line” > Click LOG
4. Select Purge Log File
5. Close Window
How to delete Session Documents?
1. Open TLW Operations
2. View -> Select Session Documents
3. Click on Edit -> Select All
4. Click on Documents Icon then Delete
How to Rebuild Tables?
1. Open TLW Administration
2. Select Tools/Rebuild Tables. A warning message appears if you have other TLW windows open. Close TLW Operations before rebuilding the tables.
3. Click Select All
4. Click Rebuild
How to repair a database in 6.x for Windows 7 64bit and Windows 10 64bit?
Note: Be sure to perform this process on both the stxfw32 and modmgr32 files.
1. Make sure that the TLW is closed completely
2. Navigate to C:\Windows\SysWOW64
3. Run “odbcad32.exe”
4. Click “System DSN” tab and select the appropriate source (stxfw32 or modmgr32)
5. Highlight the file, click Configure
6. Verify correct path to *.mdb file and then click Repair. Click OK (this might take a while depending on database size).
7. Click OK, select the Compact option
8. Click OK, verify the path is directed to the correct *.mdb file and then select Version 4.x, click OK to begin the compact process
9. Click Yes to replace. Wait until a success message is shown on the screen.
10. Click OK to close
How to repair a database in 6.x?
Note: Be sure to perform this process on both the stxfw32 and modmgr32 files.
1. Because TLW 6.x uses the Windows Installshield wizard, the OBDC repair must be done from the Windows Control Panel
2. Open the Control Panel in Windows, Start-> Administrative Tools -> ODBC Data Sources.
3. Click “System DSN” tab and select the data source (stxfw32 or modmgr32)
4. Highlight the file and click Configure
5. Verify correct path to *.mdb file and then click Repair. Click OK (this might take a while depending on database size).
6. Click OK on the success message and then select the Compact option
7. Click OK, verify the path is directed to the correct *.mdb file and then select Version 4.x, click OK to begin the compact process
8. Click Yes to replace. Wait until a success message is shown on the screen.
9. Click OK again to close
*** Repeat this procedure for any other data sources, such as STXFW32 or MODMGR32.
Note: If you receive the following error during the compact process, “Cannot perform this operation; features in this version are not available in databases with older formats” change from the default Version 3.x to Version 4.x on the “Database to Compact Into” screen and click OK. And then follow the directions above.
If you need assistance maintaining your database or with TrustedLink for Windows, contact Meta Tech today.

